Friday 29 November 2013

For the Knackered Cows & Grumpy Bullocks Out There… A Cowshed Full of Christmas Gifts!

Born in a shed in 1999, Cowshed has quickly expanded from a spa set in the gorgeous surroundings of Babington House in Somerset to a suite of global store locations all over the world offering natural and honest bath, body and skincare products.

With British heritage still very much at the heart of all Cowshed products, every thing is created using the very best organic, wild crafted and fairly-traded plant extracts and essential oils. The team at Cowshed believe that there are few things in life better than an English country garden, and we wholeheartedly agree!

Cowshed - Made in England
      
Each of the products carry playful names including Knackered Cow, Moody Cow, Grumpy Cow, Lazy Cow, Gorgeous Cow and many more cheeky ones, allowing customers to shop by mood. This enables the products to work on enhancing moods with formulations built on thoughtful scents, mood-lifting colours, botanical ingredients, indulgent textures and herbal remedies.

Cowshed offers a huge variety of indulgent treats for the body, but you can also browse their Living & Home section including handy travel products and colourful notebooks, or if you want to try an organic baby range, check out their cute Baby Cow products too. 

Cowshed Christmas

With Christmas gifts in mind as we are approaching the festive month of December, we thought we’d share our top picks, and better still each of the products we’ve picked are included in the Cowshed 20% discount for Christmas!

If you are tired of the traditional Christmas cracker, why not shake it up a bit this year and try the Cracking Cow, a cracker filled with two little Cowshed bath & shower treats, this could also work for a fun stocking filler too!

Cowshed Christmas

If you know someone who is on-the-go a lot for work, why not treat them with this gorgeous travel candle gift set, to set the mood in the hotel room after a long day! The scents include Knackered Cow for relaxation, Wild Cow for invigoration and soothing Lazy Cow.
Cowshed Christmas

Upgrade the Lynx aftershave gift set this year to the cheekily named Bullocks for Men Duo Set, ideal for a man in your life that could benefit from a little grooming. He needs to know the set includes a ‘Bracing Body Wash’ and a ‘Soothing Moisturiser’, you need to know it’s enriched with Essential Oils of pettigrain and grapefruit to revitalise with hemp seed to soothe and restore. 
icon

To see the full range of Cowshed products, click on any of our images above or head to their website here. You can also find out all the happenings in the ‘shed’ over at the Cowshed blog too! 

We love that one of our favourite Birmingham eating spots, Fleet Street Kitchen stock the bathrooms with Cowshed products only; it really makes a difference and adds an extra special touch to the overall experience. To find out more about the new trendy restaurant in the heart of Birmingham you can visit their website here.

Katie x

Tuesday 26 November 2013

Seven Simple Steps to Creating the Perfect Christmas Tree

It's National Tree Week and it’s nearly the magical month of December and there is only one tree on our minds... the Christmas tree! We thought what better time to write a post about my favourite Christmas activity (yes even above opening my presents!)... decorating the Christmas tree!

My Christmas decorations usually take a traditional path mixed with modern... red and gold with tartan blended with bursts of deep purple (my favourite colour). So although there are so many different ways to decorate your tree, I've put together my tips for a stress-free decorating session...

Step One:
Put on your favourite, comfy Christmas outfit, dig out the Christmas songs and pop them on and finally pour your top Christmas drink... mine is a Snowball (sorry!) - I love eggnog!

Sign

Step Two:
Unpack the dreaded Christmas decoration box putting all decorations in piles of either the same type of decoration, I normally have three of each at least, or the same colour. I like to keep my favourite few in a pile together as they need pride of place at the end along with my tree topper.

Also don't forget to untangle the lights prior to starting, being careful not to tread on any as I usually do.

Tip for January: wrap lights around an empty kitchen roll tube, making a cut in the side to pop the end through (it helps!)

Step Three:
First up are the lights, for a six-foot tree I use three sets of clear lights; two static and one (longer) twinkling set as the lights are probably my favourite Christmassy item. To get perfectly positioned lights imagine the tree split in half and use the two static sets to fill the halves and then the twinkling set spread across it all.

It's best to rope in someone else with one taking the end and the other feeding them through, carefully winding each set of lights around the tree in a spiral shape, not forgetting about the back as, although not as prominent, the little lights do shine through.

Once all sets are on, I like to finish it off by pushing some towards the trunk and bringing others to sit on the ends of the heavier branches to give a bit of depth. I love the look of the tree at this stage and some years I have been tempted to leave it with just lights on but no... decorations are lovely!

Tip: At this point, switch off all your lights, ready for the unveiling at the end!

Fairy Lights

Step Four:
If you use tinsel it's time to put it on. Some people love it, some hate it - I love it, my mum hates it but, seeing as I'm always the decorator, I put it on! I only use about three strings of tinsel in one neutral colour (gold on mine) and split the tree into thirds this time with some on the top few branches, some in the middle and the majority in the thick bottom.

Step Five:
Now for the decorations... if you have bows or ribbons, put these on first spreading them evenly throughout the tree. The key to any 'perfect tree' is to spread similar decorations across the tree so they pick up the light at different points and give people more to look at hence the splitting of decorations at the beginning.

Next take all your 'basic' decorations (plain baubles, ones you have a lot of or your least favourite) and add them to your already pretty tree, spacing them out front and back, top and bottom. I like to do this in colours so I get a good balance.

Finally, get out your special decorations ready to find the perfect places for them. I have a few favourites, such as little gifts from my fiancé or those picked up on my travels from India to Denmark, and although don't exactly fit with the colour-scheme, they simply cannot stay in their boxes! I dot these mainly at the front of the tree so visitors can admire them on first glance.

Tip: A friend of mine who is spending her first Christmas in her new house wanted to know how many decorations was recommended for a six-foot tree... apparently it's 60. I've never counted mine but I'd say 30-50 is more than enough.

Step Six:
Enter the tree topper... the icing on the cake! When you're happy with your tree, add the last piece whether it be a star (like mine) or a homemade angel, this signals the end of the decorating! I'm usually tired (and fed up) by this point but ready for the final step...

Step Seven:
Put on your favourite Christmas song, take a sip of your Christmassy drink (you deserve it!) and switch on the lights... et voila - your perfect Christmas tree!

Now after all that effort, if you ask someone nicely they may tidy up the empty boxes for you - just remind them of just how gorgeous the tree is!

Christmas Table

This has made me very feel very Christmassy and excited about putting my tree up in December!

Jane x

Thursday 21 November 2013

Hot Yoga: Going Barefoot into the Unknown…

This year I set myself a goal to try Yoga, especially Hot Yoga, for the first time. Little did I know that it would have such a profound effect on everything in my life!

Jane is an avid Pilates student, and I knew that Yoga might help a host of things including posture, balance and core strength. I had a knee operation a few years ago and so there was some work to do to readdress the strength in this part of my body.

When the Amazon Local offer for Barefoot Birmingham dropped into our inboxes in the Summer, we knew this was our chance to finally try Hot Yoga.


Barefoot Birmingham is a beautiful, unique and calm Yoga & Wellbeing studio in the heart of Harborne, only a couple of miles from Birmingham City Centre. The team pride themselves on offering a ‘big, beautiful, warm, sweet-smelling studio’ to guests and it really stands out as a clean and spacious place to visit, especially when you compare it to a brightly lit, smelly environment that some gyms and hot yoga studios (that Jane has tried) can be sometimes.

Our first Hot Yoga session was incredibly hot, due to an influx of new guests waving the Amazon Local offer! However in the weeks that followed, we experienced perfect class sizes, pose-by-pose education and inspiration from the instructors, our favourite being Nicola Rowan-Brooks, and with each session I could feel small improvements in my strength and balance.

That was a great thing, feeling strong, especially when normally you can hear me saying ‘my upper body strength is awful’ or ‘I’ve pulled my back again, I need to have better core strength’ Both Hot Yoga and Dynamic Yoga provided me with a solution to address these issues, while feeling like I was enjoying myself!

I know it sounds too good to be true, but here’s the most unexpected thing; it improved so much more than that. The time I spent in class actually had a positive effect on my mood, my stress levels, my focus and my clarity of thoughts. This year has been a whirlwind roller-coaster for us both and we are coming up to a very busy finish to it, so my mind is currently like this 24/7:

Katie and Jane

The meditation element in Hot Yoga aimed at stilling the mind, was so valuable in calming my thoughts and crushing the swirl of worries, things to do, things to remember, things I’ve promised, places I need to go, people I need to visit, and that’s just the tip of the ice berg – I’m sure I’m not alone! (Well, I know Jane is definitely the same!) When you start out in your own business, it completely takes over your life, in a great way, but your life and work becomes inseparable.

The overall experience of being a Barefooter was seamless, you can book online, arrive 15 minutes before the class, and the studio even provides showers, face wipes, tea, water and free yoga mats if you’re not ready to buy one yet. One of my favourite touches has to be the sign on the wall as you leave the studio "Everything is Okay". They have a wealth of classes I’m yet to try including WeekendWind-Down Yoga by candlelight on a Friday evening. 

Katie and Jane

You can find out everything you need to know, become a member and view the class timetable here: www.barefootbirmingham.com

We hope you are inspired to give it a try, at least once! 

Inspirational quote
Katie x

Tuesday 19 November 2013

A Beautiful Mess Challenge Eighteen: Create a Triptych

A triptych is similar to challenge seventeen where two images are linked together but this one is (you guessed it!) three!

Triptych

The book recommends you tell a short story, almost like a comic strip so what better way to do this than tell a story of my lazy dog Beau...


The A Beautiful Mess girls give you a few tips in the book - check the colours so that the viewer's eye travels from one to the next, vary the level of detail and communicate one simple concept. One idea in the book is to create a recipe of raw ingredients, preparation and then the final product... I'm going to do that soon!

Until the next challenge!


Jane x

Previous Posts...

20% Off Our eCourse 'Create an Effective Facebook Strategy' Plus a Fun New Competition!

We blogged last week about our first SkillShare eCourse 'Create an Effective Facebook Strategy' and we're excited to let you know that it's now live on SkillShare for just $23/£14!

SkillShare

SkillShare is a fantastic global website where you can discover new and interesting courses to take at your own pace through video lessons, powerpoints, audio and project tasks. Each class finishes with a final project where students can display their skills and get practical feedback from the teachers.

The final project on our eCourse asks students to complete a full Facebook strategy after being carefully guided by us through six lessons; the power of social media, Facebook's key features, Facebook guidelines, Facebook audits, social media evaluations and finally, strategy. By the end of the eCourse you'll have your strategy, you'll understand how to evaluate your presence and also how to audit yourself and your competitors.

Our eCourse is packed with 12 video lessons (you'll see our faces a lot!) where we bring our real-life social media experience and knowledge to you. We wanted to make the eCourse as fun as possible so students who complete the eCourse and upload their final project will be entered into our competition to win an online social media advice session with us both worth £150!

Skillshare

Until the 26th November we also have 20% off the eCourse so there's no better time to sign-up! Remember, you don't have a time limit to complete the course so you can work at your own pace and still benefit from the 20% reduction. Although to be in with the chance of winning the competition, you need to upload your project before the end of the year.

Follow the link: http://skl.sh/182SQmb and use the code: KJFB20 to get your discount today!

If you have any questions about the eCourse tweet us at @janiexx or @KatieAMcD or email us at smile@katieandjane.com

Enjoy!


Jane x

Sunday 17 November 2013

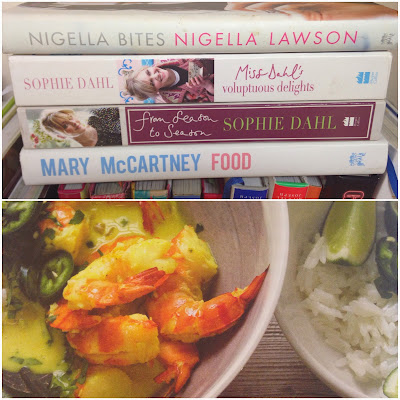
A Beautiful Mess Challenge Seventeen: Create a Diptych

I didn't know what a diptych was before I read the A Beautiful Mess book despite unknowingly having made a few myself! A diptych is a pair of images displayed together and, as the book says, it's simple to create but it's the story behind it that takes the thinking.

Create a Diptych

Above, in the book, the girls bring out their love of craft with the cotton - in this challenge they say the key to a successful diptych is pairing something interesting and meaningful together. I didn't want another picture of myself after yesterday's 30-day self-portrait challenge so decided to display my love of cooking and cookbooks in my diptych.

Create a Diptych

I used iPhone app PicPlayPost - a new discovery which enables you (for free) to paste images together and share them on social media or via email... perfect for this challenge!
Tomorrow I'll be creating a triptych!


Jane x

Previous Posts...

Saturday 16 November 2013

A Beautiful Mess - Challenge Sixteen: Take the Thirty-Day Self-Portrait Challenge

A Beautiful Mess Book

In the A Beautiful Mess Photo Idea Book, the girls talk about a photograph challenge they found really rewarding on Flickr - the 365 Challenge. It asked participants to take a self-portrait every day for a year with the following rules...
  • You had to be in the photo yourself in some way
  • You had to take the photo yourself

Thankfully, the challenge in the book was not 365 days of photos but 30 - a modified version following the same rules. The book says how creative they became over the 365 days but I found it tough to remember to take pictures over 30 days let alone a year! 


I tried to capture something that I enjoyed or meant a lot to me every day to include in this challenge although I did have to cheat a little and use older self-portrait photos to complete it! Never-the-less I really enjoyed doing it and here are my results...


Jane x

Previous Posts...